Custom object
This object has no fixed geometric form except the top and bottom are parallel.
This object offers great flexibility, but cannot make any object. Be sure to read the hints below. :-)
| Object properties | |
| Select 'Edit'-tab to see the Custom
object dialog box. The 'Points'-tab is only to adjust single points |
|
| Textures | |
| Top | |
| Bottom | |
| Side 1 | Polygon between point 1 and point 2. |
| Side 2 | Polygon between point 2 and point 3 |
| Side 3 | Polygon between point 3 and point 4 |
| Side 4 | Polygon between point 4 and point 5... |
| Side n | etc |
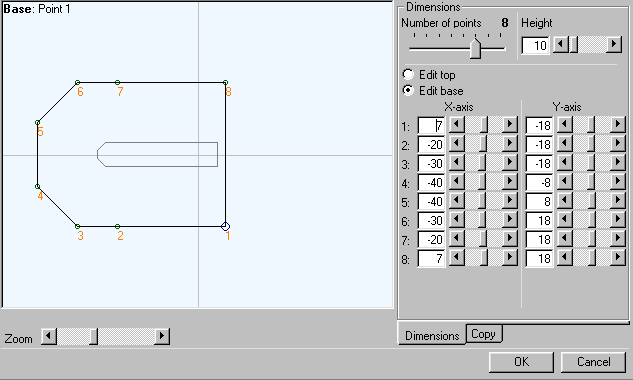
Number of points: Determines the total number of points and hence the number of
sides of the object. The object shown has 8 sides.
Height: Height of the 'Top' above the 'Base'.
Edit top/Edit base: Selects the top or bottom for editing.
X/Y-axis: The X/Y Coordinates for each point.
'More' tab: Opens the dialog box that allows the base shape to be copied to the top, and vice verse.
You can also move all points together.
Hints
|
|
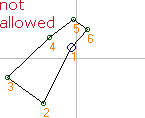
Position the points in a clockwise direction. A line will connect Point 1 base with point 1 top, etc. in the pane view in the main EOD dialog box, and will be the border for the side and hence for the applied texture. |
|
|
The center point (crossing grid lines) must be within the envelope of the object. If the center point falls outside the object, the textures will appear on the wrong side. |
|
Tip: |
Use a 270° X-Rotation to make a 'horizontal' custom object e.g. for hangar roofs. |

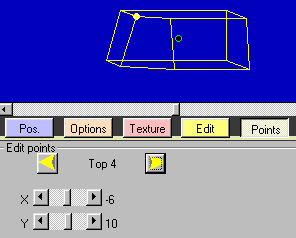 |
Select a point with the yellow arrow buttons. The selected
point will be visible in the blue panes. Use the X- and Y-scrollbar to change the position of the point. It may be confusing if the custom object has been rotated. Use the arrow keys to move the selected point. |
Further topics:
- Orientation of objects.